B.-A. Behrens, A. Bouguecha, M. Vucetic, S. Hübner, D. Yilkiran, Y.-L. Jin, I. Peshekhodov. FEA-Based Optimization of a Clinching Process with a Closed Single-Part Die Aimed at Damage Minimization in CR240BH-AlSi10MnMg Joints. Key Engineering Materials (Volumes 651-653), pp.1487-1492, 2015.
Mechanical joining processes are one of the oldest joining techniques in metalworking and are used in particular in the sheet metal industry. The advantages of these processes are the joining of different materials, the joining of parts with different sheet thicknesses and the joining without successive reworking. Another advantage is that these processes can be implemented particularly economically.
The best-known mechanical joining processes are self-pierce riveting and clinching. Compared to clinching, self-pierce riveting is characterised by its high static and dynamic strength, which can be explained by the use of auxiliary joining parts. Clinching is characterised by its simple process sequence, in which no auxiliary joining parts are used, and is therefore more economical than punch riveting. Clinching can also be used to join coated sheets, different sheet thicknesses and sheet materials.
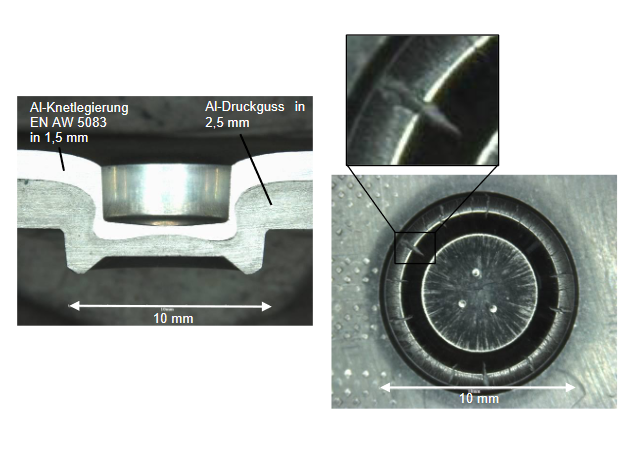
Clinching is becoming increasingly important, especially in the automotive industry, where cycle times and process efficiency play a major role. For this reason, new areas of application are being continuously researched at the Institute of Forming Technology and Machines. In particular, the focus is on the applicability of the process to new material pairings, which especially promote the lightweight potential of the car body. The suitability of die-cast aluminium components has been investigated in various projects. By adapting the tool and material, it is possible to achieve clinching of these materials, see Fig. 1. Reference tools were optimised in such a way that the deformation of the die casting material is minimised under tension-dominated stress conditions and maximised under pressure-dominated stress conditions. This reduce the probability of damage as a result of the joining process.
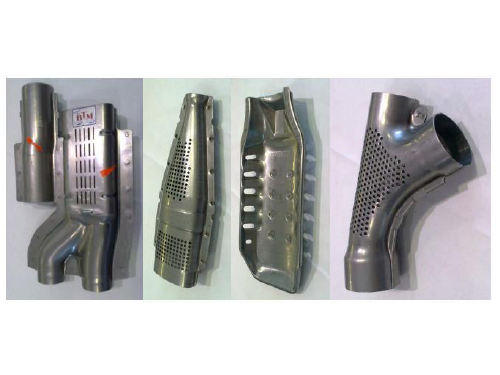
Furthermore, clinching is investigated for load areas with special requirements. Alternating heating and cooling to room temperature and to temperature levels of 400 °C to 900 °C, respectively, as well as additional cyclic mechanical loads are used to simulate conditions prevailing at clinching points in an exhaust gas line, cf. figure 2. The focus of the investigation is on both an austenitic and two ferritic stainless materials, which are joined by means of a beam-shaped and a round-point clinching tool. The joint strength of these specimens is measured by a quasi-static tensile test following the test cycle. The effects of the characteristic fatigue behaviour of different materials as well as of those different clinch points were quantified. As a result of these tests, strength increases as well as decreases in joint strengths as a consequence of the test cycle. The underlying mechanisms were fully detected and explained.
Furthermore, research is being carried out to investigate how joining processes can be integrated into forming processes such as deep drawing. Various approaches have already been researched for this purpose. One of these is the combination of setting functional elements in components made of 22MnB5 during mould hardening, cf. figure 3a. Successful implementation of punch nuts in the component during the mould hardening process has been achieved. As a result, the number of downstream setting processes can be reduced. In addition, component defects such as microcracks or significant hardness differences between the functional element and the component, which occur in conventional processes, are avoided by this novel method.
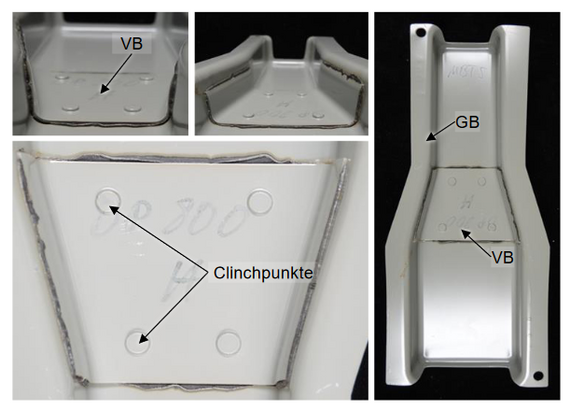
Another approach is the integration of clinching into a deep drawing process. The designed Bonded Blank tool allows deep drawing and simultaneous joining of bonded double-layer sheets in the lower point. In the Bonded Blanks process, components made of a base sheet (GB) are locally supported with a reinforcing sheet (VB) to strengthen the component. Until now, both sheets have been welded together in this process. By integrating clinching, manufacturing costs can be saved. The clinching tool designed for this purpose was designed as a pure tool insert, which does not require a hold-down device or its own drive. This process was applied to structural components, see Fig. 3b, and it was demonstrated that this results in a significant increase in component strength.


Publication
This paper presents results of an FEA-based optimization of the tool design of a clinching process with a closed one-piece die. The materials investigated are CR240BH hardenable steel on the punch side and AlSi10MnMg die-cast aluminum alloy on the die side. The optimization is aimed at suppressing cracks that occur on the bottom side of the clinch joint in AlSi10MnMg when conventional die designs are used. By varying the geometry parameters of the dies, it is possible to reduce the probability of cracking, but together with slightly worse but still acceptable geometry parameters of the clinch joint.


